
The Warp engine at the heart of Ableton Live is designed to let you drop in audio files, and instantly sync them to the master tempo of your project. This works with anything from single drum hits to loops and samples, or even full tracks. It’s what makes Ableton different from other DAWs, and what makes it so suitable for DJs. Since everything is designed to happen in real-time, there’s no awkward dragging of wave files to grid markers and waiting for the right moment to hit the space bar. Between warping and the intelligent snap mode, you can set everything up to trigger just when you want it to, allowing you to create sets on the fly.
 Create a pair of channels and assign one to each of the “A” and “B” channels of the crossfader as described in the “101” article here. Choose a pair of tracks that are close enough together in tempo that you can conceivably mix them together, just like you would in a dedicated DJ application. Drag the first track into the top slot of the first channel, and the second on to the second channel.
Think of each channel as a deck, with the slots at the top of each representing cued tracks ready to be played. In a perfect world, you could just hit the play trigger on the imported track, and everything would be fine, but to get the best from Ableton, it’s often necessary to do a little tweaking to make sure everything syncs correctly.
You can do all this on the fly once you’re confident with Ableton, but when you first start using it in a live situation, you might want to remove some of the stress by setting up the tracks from your set at home. This way you can build a setlist before your slot and ensure that everything drops perfectly on the beat. All you have to worry about on the night is triggering the tracks at the right moment. Whenever you beat-match a track, Ableton creates a corresponding “Warp Map” file and places it in the same folder, so you won’t need to re-tweak the same track if you ever want to use it in another set.
Beginning to Sync
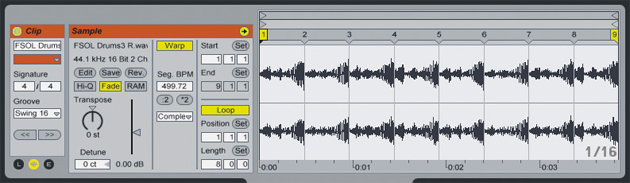
For DJs, the most important thing to get right is the location of the first beat. Your first task when importing a new track is locate the real first beat of the song, the “one,” then dragging the “1:1” marker to the corresponding spike in the waveform. Play back the track and ensure that the tempo of the project matches the tempo of the track.

Count the first four bars and pay attention to the grid numbers at the top of the waveform view. 4 bars in the song should equal four bars on the grid. If not, find the first beat of the next bar and drop a yellow marker on it by double-clicking, then drag it to the 5.1.1 point on the grid. Depending on the track, much of this should be done for you, but it can be worth playing through the whole thing to make sure that it doesn’t stray from the beat.
Less Can Be More
The time-stretching process in Live is very smooth and provided you stay relatively close to the song’s original tempo, you won’t be able to hear any difference from the original. Electronic music that has a perfect digital metronome will do particularly well here. The Warp engine will detect each beat and apply the same time-stretching processing to the entire track.
However, Hip-Hop and funk music with a live drummer requires a lighter touch. Loose fills and syncopated rolls can sound a little lifeless and robotic if you let the warp engine lock every drum hit exactly to the grid.
You can preserve that humanistic feel by using as few markers as possible, keeping the rhythmic manipulation to a minimum. Just use markers to tweak the start and end points of each loop, and delete any that appear between them by double-clicking the tops of the markers.
Quantizing
When you hit the play button in each clip, you can choose to have it trigger instantly, or to wait for the next milestone in the master project’s time signature. That might be super accurate 16ths, or rock solid 4-bar intervals. Use the drop down menu at the right hand side of the transport bar at the top of the screen to select the quantization. For DJing, I tend to use 4-Bars. This way, with one track playing, I can wait until I hear the end of a phrase approaching, then count “one-two-three-four” right before I want to drop the next track, as if I’m a bandleader counting in the musicians that are going to play the second track. I can click the play button on the second track at any point during this count, and it will trigger the second track right on the first beat of the next bar. It doesn’t matter if you hit play on the “one” or the “three,” the quantizing will hold off until the next 4-bar loop starts before it allows the track to play.
![]()
This is particularly useful if you are using a mouse or trackpad, as it can buy you that precious extra second needed to reposition your cursor over a fader or an effects knob.